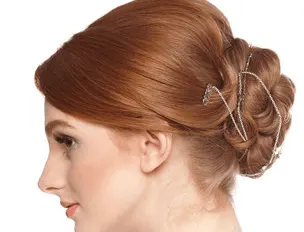
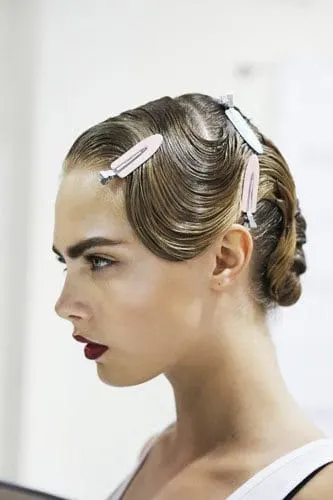
The ’20s-inspired mod hairstyle is fabulously chic, is it not? The best part is that, with some practice, you can whip up this ‘do at home. You’ll need the gel, mousse or hair cream of your choice, a lot of bobby pins, decorative clips and a comb. This look is far from messy or carefree, so be sure to keep all the stragglers tucked in while you work. Here’s how.
The 4-Step Mod Hairdo
1. Make Two Distinct Sections

Begin with damp, towel-dried hair. Use a generous amount of gel, mousse or cream to provide a hold, but make sure it isn’t a quick-setting or drying kind. Comb the product through your hair from the scalp to the ends. Using your comb, make a part from your left ear to your right and secure the front section out of the way. Comb the back section down your neck and make sure your hair is free of tangles.
2. Twist and Pin, from the Back

Taking smaller pieces from the back section, begin by twisting and curling pieces with your hands, using bobby pins to secure them flat to the back of your head as you go. The trick is to make them look like a tight bun made of smaller curls.
Also, use only as many pins as you absolutely need. The product you use should help hold everything in place without you needing to give yourself a headache.
3. Keep Twisting and Pinning

Continue working, section by section, weaving and looping the pieces together and securing in place. You can tuck pieces under other pieces and wrap in any direction. There are no rules here, so have fun with it. As long as you keep the flyaways away, you’re golden.
If you have lots of hair, you’ll see much more volume at the back. Thinner, shorter hair will produce a flatter style. You may need the help of a friend to make sure the hair covers your pins, but the end result will still be stunning.
When all the pieces of the back section are secure, you’re ready to move on to the front.
4. Style the Front

The front section is similar to finger waves. First, part the front section slightly deeper than you normally would. Start with the side that has more hair and comb it backwards. Place a decorative clip in your hair to hold that section in place.
Next, take the same section of hair, just past the clip and comb it forwards. Then, swoop the hair back in a big wave over your temple. Secure it just behind your ear with another one or two decorative clips. The rest of that section can be weaved into the back design and secured with regular bobby pins.
For the other side, simply pull your hair back tight off your face and secure in the back. Lock it all in place with a finishing spray and step back for a look in the mirror. Smile at your handiwork and head out the door looking like a mod chic goddess with your new hairdo.
sofia
Saturday 16th of September 2017
This is a lovely post.
Catherine Brock
Monday 18th of September 2017
Thank you! ~Catherine
Vintage
Thursday 21st of November 2013
What on earth is a 20s mod? Mods are 60s, flappers are 20s.
Fotodiva
Thursday 25th of October 2012
I agree, would have liked to have seen the back :) Great look!
Kat
Thursday 25th of October 2012
I like the hairstyle, but none of these pictures show the back, although the first steps focus exclusively on the back.